I have a couple of videos to share with you this week for Sale-A-Bration. Remember, this is a great time to host a party or place an order because for each $50 you spend, you earn FREE PRODUCT.
Thanks for stopping by. I'll be back tomorrow to show you some of my Sale-A-Bration creations. :)

07 February 2011
01 February 2011
A Stampin' Up! Valentine!
Happy 1st. :) I do hope you're warm and safe today with all crazy weather!
Can I share some things with you??

Cute?
Here's some close ups...!
 That's the Newsprint and Love Letter DSP in little magnetic frames. A bow made of seam binding on the upper left. Big Shot butterflies, letters, hearts. (Remember Bigz dies cut multiple layers at once....fold your cardstock, keeping the fold lines INSIDE of the die and you'll make paper-dolls! Or in this case, connecting hearts!). I used Stampin' Up! dimensionals to hold the hearts. I cut out the Eiffel tower from Artist Etchings and coated it in Glassy Glaze.
 Here's a basic glass candle holder I bought from a discount store ($1). I used the sticky pages (it's a giant sheet of sticky strip!) and my Big Shot & simple letter die to cut out LOVE and sprinkled on the Silver Glass GLITTER! A little tip if you try this at home...applying the letters to a curved surface can be a bit tricky.
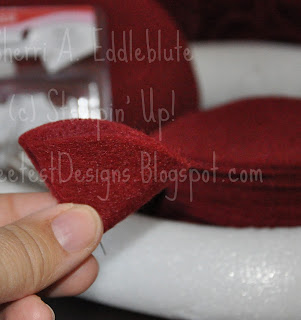
 If you'd like to recreate the wreath, here's what you need. It's rather easy and you can finish in about 2 hours.
 You need a little less than 1 yard of felt. Mine was $2.99/yard at regular price and I thought it was a rich Cherry Cobbler color! I cut the felt in 3-1/2" strips. Using the Big Shot, cut one-hundred (100) 3" circles. You can cut multiple layers at once! It goes rather quickly. :)
I bought straight pins. You need 100 (one for each circle) plus a few extra for the bow. The wreath styrofoam came from a craft store for $3.19 at regular price. And don't forget your favorite Stampin' Up! ribbon. I used 5/8" Very Vanilla Satin ribbon. Yummy!!
 At first, don't be alarmed if it doesn't look like much. It'll come together and you'll get a feel for spacing. If you see the styrofoam peeking thru, simply move some circles over. 100 circles was perfect for my wreath form.
I don't cover the back and I used some pins to hold the ribbon hanger in position.


Can I share some things with you??

Cute?
Here's some close ups...!


I bought straight pins. You need 100 (one for each circle) plus a few extra for the bow. The wreath styrofoam came from a craft store for $3.19 at regular price. And don't forget your favorite Stampin' Up! ribbon. I used 5/8" Very Vanilla Satin ribbon. Yummy!!

Take each circle and fold in half and then in half again, pushing the pin thru the tip and into the styrofoam. Here's another view (below).

I don't cover the back and I used some pins to hold the ribbon hanger in position.

Thanks for stopping by and have a great day!

Subscribe to:
Posts (Atom)